

The Elemental Cost Plan template in the AIQS Cost Management Manual (Volumes 1 and 2) remains applicable to 5D BIM cost planning. The underlying principle of cost planning is unchanged:
you need to know which cost items are required and what unit of measurement applies to each in order to complete the cost plan at various stages of design.
The only difference is the technology. Instead of using spreadsheets or on-screen measurement, you extract quantities from Revit (BIM authoring software).
Workbook
The Workbook is the key to Cost Planning. It provides a user friendly work space, just like any spreadsheet to consolidate 2D and 3D quantities into a single live inventory pane where items link directly back to their visual source for easy auditing and traceability.
The Workbook is where you do your billing. You can format it however you like — e.g., elemental cost plan, trade bills, construction work breakdown schedule, etc. — then export it in Excel format for subsequent use.
The accuracy of a cost plan depends on the level of detail available when it is prepared. To make BIM model maturity easier to understand, the Level of Development (LOD) can be mapped to the common design stages as follows:
LOD 100: Master planning / Pre-concept / Concept design
LOD 200: Schematic design
LOD 300: Detailed design
LOD 350: Fully documented design
Use the LOD as a guide to prepare a cost plan that matches the level of information available at each stage.
The Workbook is in drilled-down worksheet format, similar to spreadsheet layout comprising 3 levels of worksheets:
Level 0 – Summary sheet
Level 1 – Detailed sheet
Level 2 – Link to QTO Schedule sheet
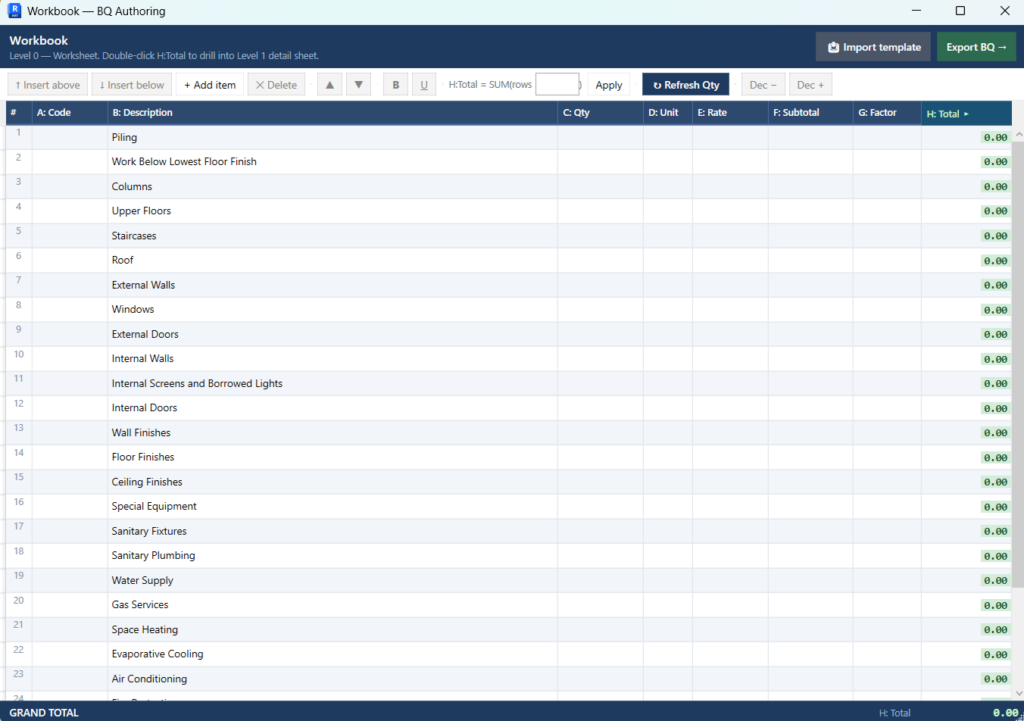
Level 0 – Summary sheet
Level 0 comprises the following pre-set headings:
A: Code, B: Description, C: Qty, D: Unit, E: Rate, F: Subtotal, G: Factor, H: Total.
Only B: Description is editable. Use it to enter the Element Summary if you are preparing a cost plan, or the Trade Sections if you are preparing a bill of quantities.
The H: Total amount is automatically rolled up from Level 1 below. There is also a summing feature for creating a ∑ subtotal in the H: Total column. For example, to sum the total for Finishes from rows 13 to 15, enter H: Total Sum(row 13:15). This feature is aligned with the AIQS Cost Plan template.
The text editor is self-explanatory: ↑ Insert above, ↓ Insert below, + Add row, × Delete, ▲▼ Move up/down, B Bold, U̲ Underline.
The Import Template feature is particularly useful for importing a previous similar project into the Level 0 and Level 1 worksheets. This saves an enormous amount of time retyping them.
The Export BQ feature exports all quantities and costs in the Level 0 and Level 1 worksheets to Excel for distribution.
To drill down from the Level 0 worksheet to the Level 1 worksheet, double-click H: Total.
Level 1 – Detailed sheet
The Level 1 worksheet has the same headings as the Level 0 worksheet, but more columns are editable so you can detail the line items. These include:
A: Code, B: Description, C: Qty, D: Unit, E: Rate.
H: Total is calculated automatically once C: Qty and E: Rate have been filled in. To get the quantity, double-click C: Qty to open the take-off sheet. At this level (Level 2), you link the quantities and line items from the QTO Schedule.
Level 2 – Link to QTO Schedule sheet
Level 2 lets you either link lines to the QTO Schedule or enter them manually. The active columns are:
- Link lines to QTO Schedule: No columns are editable. Click the Link to QTO button and select the line items from the pop-up list.
- Enter manually: Description, C: Qty, Unit, G: Factor.
A particularly useful feature is Show Source, which highlights the linked line items on the canvas. This lets you confirm exactly what you are billing.
Pick and Paste Mouse Feature
Pick & Paste speeds up linking QTO Schedule line items to the Workbook. Once you’ve verified the element properties and confirmed them using Show in 3D:
- Pick the line item from the QTO Schedule.
- Switch to the Workbook and select the C:Qty cell for Level 1.
- Right-click and choose Paste.