

In 5D BIM, the Run QTO command extracts quantities directly from the model, eliminating the need for manual takeoff (dim sheets) or on-screen measurement. The QTO Schedule keeps all extracted quantities in one place, arranged systematically under their respective headings for easy reading, identification, filtering and source tracing.
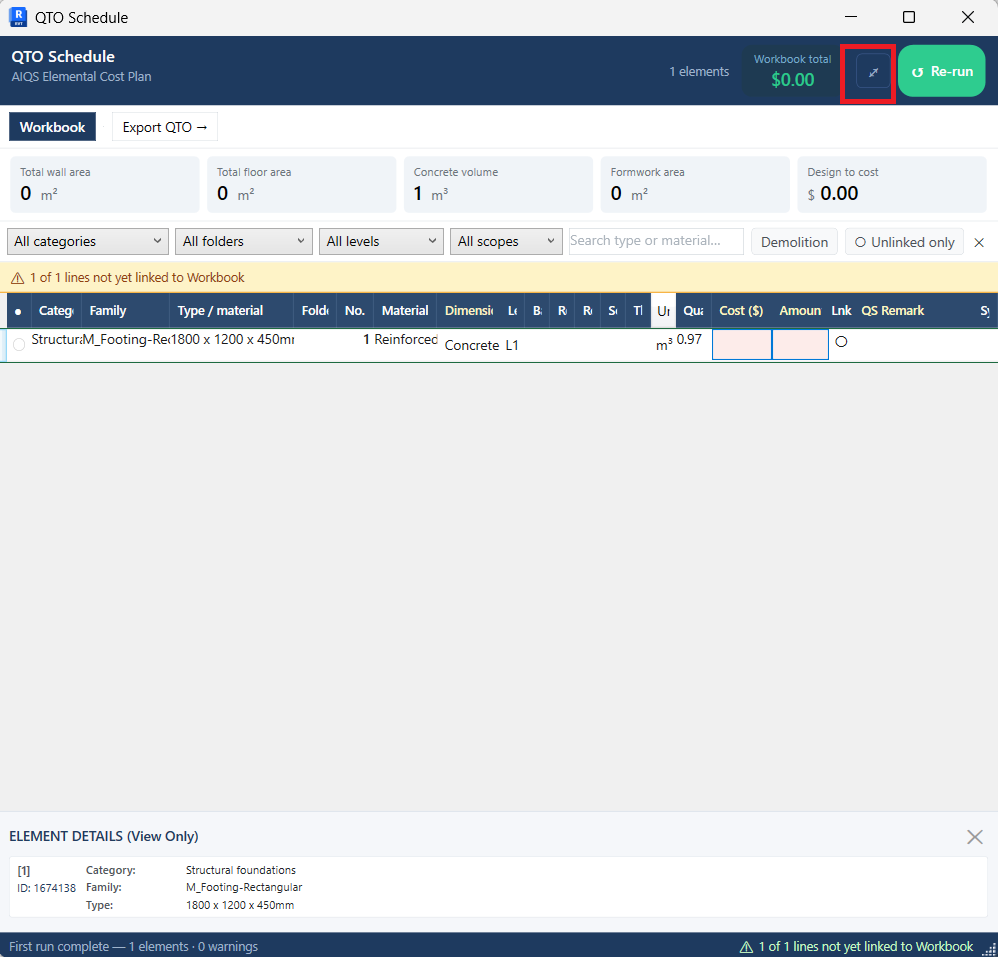
In the top-right corner, to the left of the Re-run button, is the expand icon. Click it to open the QTO Schedule in a full-size floating window for easier reading.
Take a moment to review the headings and understand what each one does. Note that element quantities with the same Category, Family Type and Level are grouped together automatically, unless the modeller has given the elements different family names.
- Category: The default Revit category under which each element is grouped. Filtering by category is a quick way to narrow your search.
- Family: The default Revit family grouping.
- Type / Material: Contains the element’s type information.
- Folder: Used to group manual on-screen measurements taken in Pick & Choose mode.
- No.: The total count of elements in each line item.
- Material: Contains the element’s material information.
- Dimensions: Shows the default geometry, i.e. area, volume, etc.
- Level: The default Revit level assigned to the element.
- Base Level: Applies to elements on an incline or slope.
- Room No., Room Name: Revit room annotations, which enable the room-bounding functions.
- Scope: Identifies whether an element is internal or external.
- Thk (mm): The thickness of the element, which matters where measurement rules require different thicknesses to be measured separately.
- Unit: The unit of measurement for the line item.
- Quantity: Either an extracted or a manually measured quantity.
- Cost ($): The all-in rate used to derive the Design to Cost total. Enter it in the Cost parameter in the element’s Type Properties panel.
- Amount ($): Calculated automatically when the quantity is greater than zero and the Cost parameter contains a value.
- Link: An amber dot appears here when the line item has been linked to the Workbook.
- QS Remark: Lets the QS add remarks about a particular element.
- System Note: An automatically generated note showing which command and settings have been applied to the line item.
Besides these headings, the QTO Schedule offers the following functions:
- Design to Cost: Lets architects, engineers and D&C contractors monitor cost as the design progresses. Applies to modelled elements only.
- Total wall area, Total floor area, Concrete volume, Formwork area: Apply to cast in-situ concrete only and serve as a bulk check of gross quantities.
- Search type or material, Demolition, Unlined only: Filters that help isolate specific elements.
As well as the Design to Cost total, the QTO Schedule shows the Workbook total, which is the figure the QS is working on, whether a cost plan, bills of quantities or similar. Note that the two totals are independent and serve different purposes: the Design to Cost total is derived from modelled elements, while the Workbook total reflects the QS’s detailed costing.
You have now covered the basic 5D BIM cost planning workflow: the Workbook, Run QTO and the QTO Schedule. Next, we’ll work through an example using the Revit sample project Snowdon Towers 2.0 (Architectural, Structural, HVAC, Electrical, Plumbing and Site).